Espresso Cookies
A one bowl cookie recipe that can be mixed up in minutes, then sliced and baked as needed for a caffeinated sweet treat. Espresso and vanilla bean enhance a staple slice and bake cookie recipe, and with the addition of a coffee glaze, dark chocolate drizzle and a caramel center, this cookie is a masterpiece of coffee flavors. If you are a coffee lover, this one is for you!

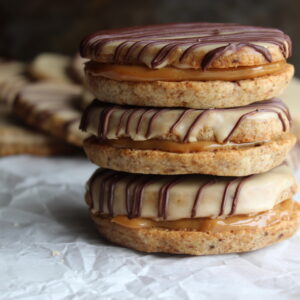
This cookie is not for the faint of heart, it is an intense coffee cookie with layers of coffee flavor and finished with dark chocolate and caramel. It is an interesting cookie in which it can be enjoyed at several different stages after they are done baking. You can eat them plain with no glaze, with coffee glaze, with coffee glaze and dark chocolate drizzle, or my favorite, glazed cookies sandwiched between caramel. They are a versatile cookie with a nice crunch and a strong coffee flavor that would make the perfect cookie for any coffee and cookie connoisseur or adult heading into back-to-school season in the next coming weeks. I love a strong black cup of coffee and a small, sweet bite to eat before I would brave the hills at Texas State University when I was younger.
Why I Love This Recipe
Flavor-a strong coffee flavor is packed into these thin cookies, and they are made even better with the addition of vanilla bean paste in the dough. French vanilla coffee is one of my go-to coffee flavors, I love the smell of vanilla and coffee in the morning, so pleasant. The addition of a creamy coffee glaze rounds out the flavor of the espresso powder baked into the dough and the dark chocolate complements the flavor of the espresso as well. I decided on adding the caramel middle because I love a mocha caramel moment with coffee. The flavors blend incredibly well with each other while still allowing the coffee flavor to shine.
Travel Well-since these are basically a shortbread cookie base, they travel well after baking. Allow the glaze to set up and you can pack these with you to snack on with an afternoon coffee.
Texture-These cookies have a crisp edge to them and a wonderful bite. The coffee glaze on top of the cookie add to the crisp edges of the cookie as well. I am a sucker for a soft middle which is why I have a soft caramel center to contrast between crisp cookie outside and gooey center.
Shelf-Life-Not only do these cookies travel well but you can keep them fresh for a week or longer by storing them in a tightly closed container on the counter without the caramel filling or glaze. They will stay fresh and ready to glaze.
Bake as Needed-this recipe is a slice and bake style recipe so you can bake however many cookies you would like at a time. No need to bake a whole batch of cookies at once! I store the dough in the freezer wrapped up tightly in plastic wrap then place it in a plastic storage bag. It is ready to slice and bake whenever the coffee cookie craving hits.
Ingredients You Need
-Butter- softened at room temperature for easier mixing into dough.
-Egg-room temperature as well, this will help the egg mix into the dough easier and not chill your butter.
-Granulated sugar
-Espresso Powder- this will give the cookie a strong coffee flavor and add small little flecks of espresso throughout the dough.
-Flour
-Salt- every cookie recipe needs a little salt to bring out the flavor of the cookie.
-Cornstarch-this helps the texture of the cookie stay crisp on the outside with a fine crumb.
-Vanilla Extract
-Vanilla Bean Paste-I love the addition of vanilla bean paste to this dough. You can omit if you would like less of a vanilla flavor.
-Powdered Sugar-for the coffee glaze. This will give the glaze a sweet and creamy texture.
-Hot strong coffee-the coffee glaze is made with hot coffee and powdered sugar. You can use any coffee that you like. If you want more of a creamy glaze and less coffee flavor, I recommend substituting the coffee with whole milk OR your favorite coffee creamer. I have made this glaze with hazelnut, French vanilla, and almond flavored liquid coffee creamers in the past and they were lovely flavor additions.
Let’s Make Cookies!

A true one bowl method of making cookies. This recipe is very simple and only takes minutes to prepare. I spent more time gathering ingredients than it took me to make this dough. I have been getting a lot of requests for simpler cookies, I understand not everyone has the time or equipment to make some of the cookies I make, so I wanted to answer the call with a simple recipe that was big on flavor and could be whipped up in minutes
**I have posted video on me making this one bowl recipe on: Instagram , Facebook , and Pinterest , if you want a visual aide on how I prepared this recipe**
In a large bowl, I added room temperature softened butter and mixed with a fork until creamy. I then added the sugar and continued mixing with my fork until it was all mixed together and creamy. This took me a few minutes of mixing. I wanted to make sure the butter and sugar were well incorporated.
A room temperature egg, vanilla extract, and vanilla bean paste were then added, and I continued to mix for a few more minutes. Next, I added the espresso powder and mixed until the powder was evenly distributed. It doesn’t mix into the batter; it will still look granular in the butter.
I sift my dry ingredients on top of the butter mixture and slowly stir everything together until it comes together in a smooth dough.
I place a sheet of plastic wrap down on my counter and dump the dough out on top of the plastic wrap. Using my hands I gently form the dough into a log and with the sides of the plastic wrap I gently roll and press the plastic wrap around the dough. The dough will be very soft at this point.
Twisting the ends of the plastic wrap closed, I roll the plastic covered dough ‘log’ on the counter to smooth the sides out.
I place the dough into the fridge to allow the dough to set up. I would leave the dough to rest for at least 2 hours, I left mine overnight. This is a great recipe to make a day or even several days ahead. The dough will stay fresh in the fridge for up to three days, then it should be stored in the freezer for longer keeping, up to 6 months.

When ready to bake cookies simple slice ¼ inch slices of cookie dough with a sharp knife, the dough will be very firm after being in the fridge, place on parchment lined baking sheet and bake for 8-10 minutes at 375*F.

The cookies are wonderful as is, or even lightly dusted with powdered sugar as a delicious and very simple finishing touch. I am somewhat of a drama queen and when it comes to cookies I am in a constant state of needing to make the best cookies better, so I have included a few more steps below to take this recipe to a whole new level of delicious.

Coffee Glaze
Disclaimer-These next few steps in this recipe are somewhat tedious but will 100% make some of the fanciest and tastiest espresso cookies you have ever made.
After the cookies have cooled to room temperature, around 20-30 minutes, I dipped them in a delicious coffee glaze.

I mixed one cup of powdered sugar with a half teaspoon of vanilla extract and 3 tablespoons of hot coffee to make a smooth glaze. I wanted this glaze to be thin enough to create a nice coating on the cookie but thick enough that it didn’t run off. The consistency of the glaze is like maple syrup, thick but not too thick. One by one I dipped the face of the cookie into the glaze and placed on a wire rack for the excess glaze to run off and the glaze on the cookies to set up.

I allowed the glaze to set up on the cookies completely before adding melted dark chocolate. This took around 30 minutes to set up. I wanted the glaze to be dry to the touch before adding melted chocolate to the tops which can turn into a mess if the glaze is still warm.

Dark Chocolate & Dulce de Leche Caramel
Once the glaze has hardened and the cookies are dry to the touch, I melted ¼ cup of dark chocolate chips in the microwave. I did this by heating them up in 30 second intervals until they were melted. I placed the melted chocolate in a small bag and cut the tip to drizzle out onto the tops of the cookies.

I only used a chocolate drizzle on half (12) of the cookies, the other I left plain since I would be making them into sandwich cookies, but you can drizzle all the cookies if you love a lot of dark chocolate.
I let the chocolate cool down and set on the cookies for around 10-15 minutes then got the caramel ready for the filling.

I’m doing a cheater method of caramel, and by that, I mean I bought a can of dulce de leche at the store and will be using a heaping teaspoonful as a filling for these cookies. I love making caramel, but the week got away from me and it’s great having pantry staples to fall back on like my beloved cans of dulce de leche. This stuff is thick, sweet, and incredibly delicious.

Using a heaping teaspoonful of dulce de leche caramel, I fill the bottom of a cookie and spread gently to the edges, making sure to not go over the edge. I top with a dark chocolate drizzled cookie on top and I am ready to be transported to mocha caramel cookie heaven.

The last few additions can be tedious, but in my opinion, it gives an amazing espresso cookie a transformation into an exceptional espresso cookie! Really, this cookie is amazing at any stage after baking, and I hope you have fun playing with this recipe and finding your perfect espresso cookie variation.
If you try this recipe and love it as much as I do, please tag, follow, and like @sunshinetxcookies on Instagram and Facebook. New posts every Thursday so be sure to follow me for more delicious cookie recipes. Happy Baking!

Espresso Cookies
Ingredients
- 2 sticks butter unsalted, room temperature
- ¾ cup granulated sugar
- 1 egg room temperature
- 2 tbsp espresso powder you can use 1 tbsp if you want a milder coffee flavor
- 1 tsp vanilla extract
- 1 tsp vanilla bean paste
- 1 tbsp cornstarch
- ¼ tsp salt
- 2 cups flour
- ¼ cup dark chocolate melted optional
- ¼ cup dulce de leche
Coffee Glaze
- 1 cup powdered sugar
- 3 tbsp strong brewed coffee (hot)
- ½ tsp vanilla extract
Instructions
- In a bowl with a fork, fluff the room temperature butter until it is creamy and smooth.
- Add granulated sugar and mix with fork until fully incorporated and fluffy, 2-3 minutes if mixing.
- Add egg and continue mixing until well blended.
- Add espresso powder, vanilla extract, and vanilla bean paste. Mix together well. The espresso powder will look granular in the butter.
- Sift dry ingredients on top of the butter mixture and mix together until a dough forms.
- Turn the dough out onto a sheet of plastic wrap and shape into a log about 3 inches wide and 12 inches long.
- Allow the dough to rest in the fridge for at least two hours and up to 3 days.
- When ready to bake, preheat your oven to 375*F. Slice the cold dough carefully with a sharp knife into ¼ inch slices. Arrange on a baking sheet and bake for 8-10 minutes. They are done when the edges are very lightly browned.
- Allow to cool on a wire rack for 10-15 minutes before decorating. You can dust generously with powdered sugar for a quick and easy decoration or continue on for coffee glaze, dark chocolate and caramel!
Coffee Glaze
- In a bowl combine powdered sugar, vanilla extract, and hot coffee.
- Mix together until smooth and creamy. The glaze should have the consistency of maple syrup. If it's too runny add more powdered sugar a tablespoon at a time, if it is too thick, add a teaspoon of coffee at a time until you reach desired thickness.
- Dip a cooled cookie in the glaze making sure the entire face of the cookie is glazed.
- Place on a wire rack to set up and for any extra glaze to drip off. Repeat with remaining cookies.
- Allow the glaze to set up for 20-30 minutes.
- After the glaze is set, melt dark chocolate chips in the microwave in 30 second intervals until melted.
- Place melted chocolate into a sandwich bag, cut the tip and drizzle the cookies with melted chocolate.
- Allow the chocolate to cool and firm up on the cookie.
- Using a teaspoon of dulce de leche caramel per cookies, place the caramel on the bottom of a cookie and spread to the edges. Careful not to go over the edge of the cookie.
- Place another cookie on top and sandwich them together. Enjoy a luscious coffee, caramel, chocolate treat!
Notes


